How-To: Install and Configure Borland® Free Command Line Tools
by Matthew Flood
Last updated December 08, 2006
| RudeServer™ Professional C++ CGI Development Libraries | ||
|
|
|
|
Installing, configuring and testing the tools takes 5 steps (each of these links goes to the appropriate section on this page).
Notes/Corrections: The links in this How-To were last verified on December 8, 2006. If the links are not valid, or you have corrections or advice for improvements, please contact me. |
|
|
NOTE: Before you can download the tools, you will have to create an account with Borland® (or log into an existing account). After accepting the license agreement, you will have the option of downloading the file using FTP or HTTP. If you use HTTP, Borland will make you download a downloader to actually get the file. I would recommend using FTP if the option is available. |
|
Run the setup program. Just click the file (freecommandLinetools.exe) downloaded in step 1 and accept all the defaults. ( More explicitly, choose: Next, then Finish, then Yes ) By default, it should install everything to C:\Borland\BCC55 (The rest of this How-To assumes this location). FYI: For the uninitiated, you should know that bcc32.exe is the main program used from the command line to compile and build programs. Lots of other files are installed: the standard C and C++ header files, object libraries containing the standard library routines, some help files, lots of example programs that most of us will never even peruse, and a few helper programs like the linker (ilink32.exe) and the library manager (tlib.exe) and some oldies but goodies like grep, make and touch. |
|
|
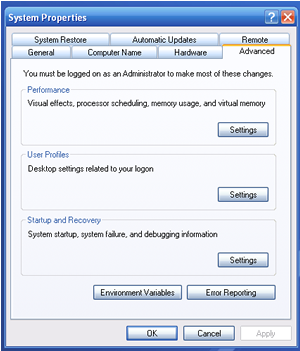
Which would you rather type to invoke the tools? >C:\Borland\BCC55\bin\bcc32 OR >bcc32 After the setup program is run (step 2), a whole bunch of executable programs are placed in a new directory : C:\Borland\BCC55\Bin. This step makes it possible for the Operating System (Windows) to find these new executables by name. If you don't do this, then you will need to specify the full path to bcc32 everytime you use it. To do this on Windows 98Add the path to the C:\Autoexec.bat file. PATH=C:\BORLAND\BCC55\BIN;%PATH% To do this on Windows NTWindows NT is very similar to Windows XP. See Christopher Moeller's Supplementary Information page if you need step by step instructions. To do this on Windows XPBring up the Environmental Variables dialog (figures 3-1 and 3-2):
Append ";C:\Borland\BCC44\bin" to the PATH variable (figure 3-2)
WARNING: If other paths are already present - don't remove them. Each path listed is separated from others by a semi-colon. Each path is the location of executables that are not in the standard locations and if you remove them some other applications in your system may break
|
|||
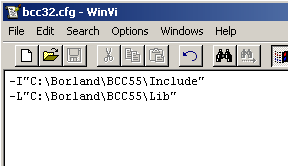
| Set up some configuration files | |
|
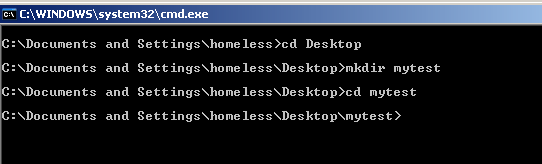
figure 4-1 STUCK? If you are having problems with this step, it can also be performed from the command line:
NOTES:
Optionally Create ilink32.cfg:
|
|
"Borland" and "C++Builder" are trademarks or registered trademarks of Borland Software Corporation in the United States and other countries. This How-To is independent of Borland Software Corporation and has not been authorized, sponsored, or otherwise approved by Borland Software Corporation.
Copyright ©2006-2007 RudeServer™